
Table of Contents
- What You’ll Need to Digitize VHS Tapes
- Step-by-Step Connection Guide to Digitize VHS Tapes
- Best VHS to Digital Converter Options
- Understanding VHS Tape Degradation Signs
- Cost of Professional VHS Conversion Services vs. DIY
- Digital File Formats and Storage Solutions
- Troubleshooting Common Playback Issues
- Conclusion
Last Updated: August 17, 2026
What You’ll Need to Digitize VHS Tapes
Digitising old VHS tapes at home requires specific hardware and software, but the barrier to entry is lower than most people assume. You don’t need professional broadcasting equipment to achieve decent results.
Hardware requirements
Start with a working VCR. Test it with a tape you don’t care about first, if the picture is fuzzy, colours are distorted, or the tape won’t play smoothly, the VCR needs professional cleaning or replacement before digitisation.
Next, you’ll need a USB capture card or analogue-to-digital converter. These devices bridge your VCR’s analogue signal to your computer’s digital inputs. USB capture cards are simplest for most people, connecting directly via USB and handling conversion internally. Look for models supporting composite video (RCA cables) and S-Video connections, as older VCRs typically use one of these standards.
Most VCRs output video through RCA connectors (red, white, and yellow plugs) or S-Video connectors. S-Video provides slightly better picture quality by separating luminance and chrominance signals, reducing signal noise. Check your VCR’s output ports before purchasing cables.
A computer with adequate storage is essential. A single hour of video can consume 4-10 gigabytes depending on resolution and bitrate. Plan for at least 1-2 terabytes of external storage if digitising a substantial collection.
Consider a video cleaning kit. Old VHS tapes accumulate dust and oxide shedding. A soft brush and proper handling prevent debris from damaging playback heads.
Software for video capture
OBS Studio is the gold standard for home video capture, and it’s free. This open-source software captures video from your USB device, records directly to your chosen format, and gives you precise control over bitrate, frame rate, and resolution.
Many USB capture cards ship with proprietary software that’s simpler but offers less flexibility. Video editing software like DaVinci Resolve (free version) becomes valuable if you want to apply deinterlacing, colour correction, or noise reduction after capturing. Deinterlacing is important, old VHS recordings were interlaced, and converting to progressive eliminates flickering and improves sharpness.
Step-by-Step Connection Guide to Digitize VHS Tapes
The physical connection process is straightforward once you understand signal flow. Audio and video travel separately from your VCR to your capture device, then your computer assembles them into a single digital file.
Preparing your VCR and tapes
Before connecting anything, clean your VCR’s playback head using a head cleaning cassette or soft brush with isopropyl alcohol. Dirty heads are the single most common reason digitisation attempts produce poor results.
Inspect each tape for visible damage: warped edges, cracked casings, or mould growth. Gently fast-forward and rewind each tape to ensure it doesn’t bind. If a tape feels stuck, stop immediately, forcing it risks breaking the magnetic tape inside.
Store your VCR in a cool, dry place for at least 30 minutes before use if it’s been in a cold environment. Condensation inside the machine can cause playback problems.
Connecting your capture device
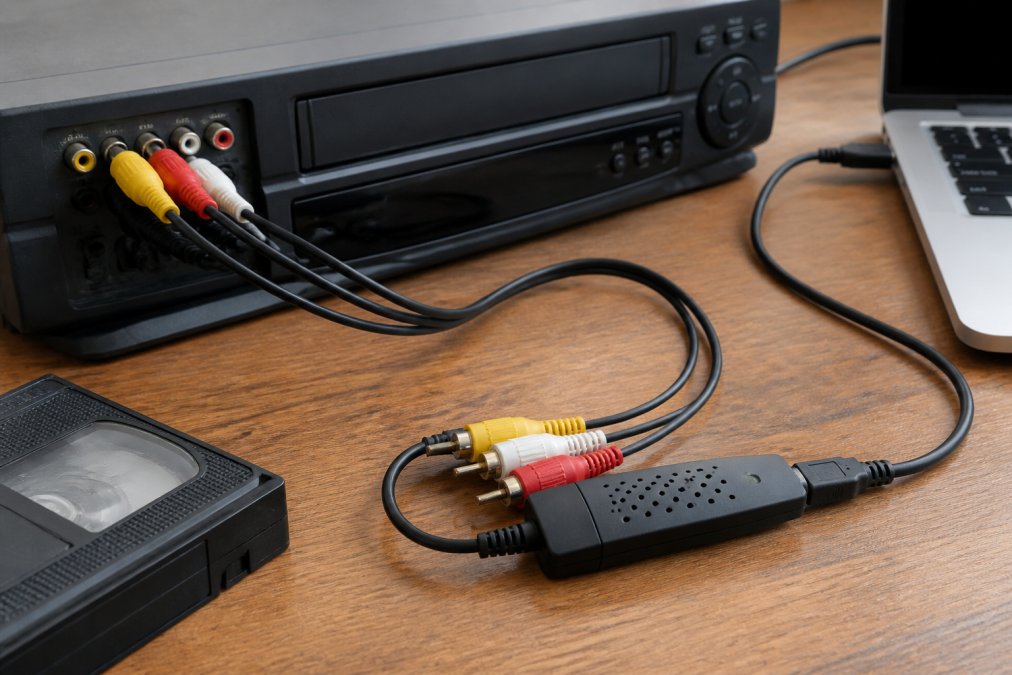
Identify your VCR’s output ports. Most machines have RCA connectors on the back, colour-coded yellow (video), red (right audio), and white (left audio). Plug the appropriate cables into these outputs.
Connect the other end to your USB capture card, matching each cable to its colour or label. Plug the USB capture card into your computer. Your operating system should recognise it within seconds.
Launch your capture software. OBS Studio will show a preview window once it detects the device. You should see video from your VCR in real time. If the picture is black or shows no signal, check your cable connections first.
Recording and encoding
Set your recording parameters before pressing play. Frame rate should match your tape’s original standard: 25 fps for PAL format (Australia) or 29.97 fps for NTSC. Start with 8-12 megabits per second bitrate for composite video.
Choose your output format carefully. MP4 is the most compatible modern container format. H.264 codec is universally supported and provides good quality-to-file-size ratios.
Press record in your software, then press play on your VCR. Monitor the first 30 seconds to ensure audio and video are both capturing. Let the tape run to completion without interruption, one continuous file is easier to manage later.
Best VHS to Digital Converter Options
The choice between USB capture cards and analogue-to-digital converter boxes depends on your workflow, budget, and technical comfort level.
USB capture cards
USB capture cards are the most accessible option for home digitisation. They connect directly to your computer, eliminating the need for separate hardware or power supplies.
Quality varies significantly. Entry-level cards (under AUD $50) handle basic composite video adequately. Mid-range cards (AUD $80-150) provide better analogue-to-digital conversion and cleaner output. Premium cards offer superior noise filtering and S-Video support.
Your computer must handle real-time video capture while running capture software. A reasonably modern computer from the last five years should handle this without problems.
USB capture cards are ideal if you have 20-50 tapes to digitise. The low upfront cost and simplicity make them practical for most households.
Analogue-to-digital converter boxes
Standalone converter boxes sit between your VCR and computer, handling conversion independently. Many include built-in noise reduction and colour correction, helping salvage footage from degraded tapes.
Quality converter boxes start around AUD $150-200. You’re paying for dedicated electronics that specialise in signal conversion, translating to better quality but higher price.
Converter boxes become worthwhile if you’re digitising 100+ tapes or if your tapes are in poor condition. The superior signal handling justifies the investment for serious archival work.
Understanding VHS Tape Degradation Signs
VHS tapes are magnetic media, and magnetism fades over time. Understanding degradation signs helps you prioritise which tapes to digitise first.
Colour shift is often the first visible sign. Reds become orange, blues shift toward purple, and overall colour saturation fades. This is permanent, the information is literally being lost from the tape.
Picture noise and "snow" indicate oxide shedding. The magnetic coating is flaking off the tape substrate. This is a critical sign that digitisation should happen soon, as continued playback accelerates the damage.
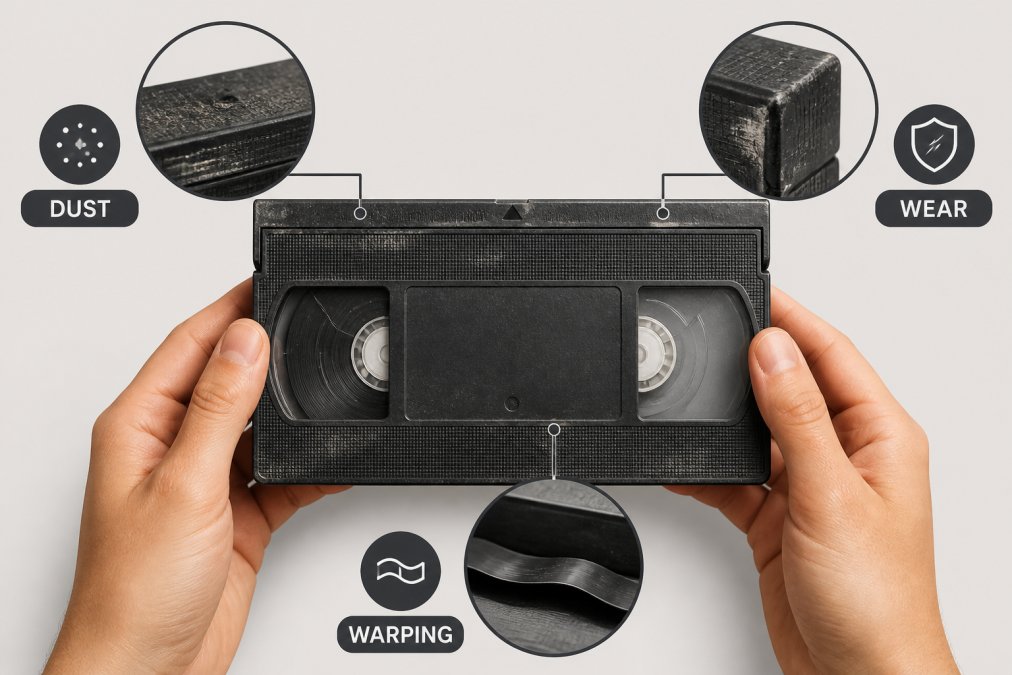
Tracking problems show as horizontal lines or waves rolling through the picture. Some tracking issues can be corrected by adjusting the tracking control on your VCR, but persistent problems indicate tape degradation.
Audio dropout or distortion suggests the audio tracks are degrading. If one audio channel is stronger than the other, or if you hear crackling, the magnetic coating is failing unevenly.
Mould growth is rare but catastrophic. If you see visible fuzzy growth on the tape or inside the cassette, the tape has been exposed to moisture and high temperature. Handle affected tapes separately.
Physical warping indicates heat exposure or improper storage. Warped tapes often won’t play smoothly and risk damaging VCR playback heads.
Cost of Professional VHS Conversion Services vs. DIY
The decision between doing it yourself and hiring a professional service hinges on time, quality expectations, and how many tapes you need to digitise.
DIY digitisation expenses
A complete DIY setup costs between AUD $100-300. A decent USB capture card runs AUD $50-150. Cables cost AUD $15-30. External storage adds AUD $60-150. OBS Studio is free.
Your time investment is substantial. Digitising a two-hour tape takes at least two hours of hands-on work. If you’re digitising 30 tapes, expect 60+ hours total, plus time learning software, troubleshooting, and organising files.
The quality floor is lower with DIY. If your VCR’s playback head is dirty or cables are loose, you’ll discover this halfway through digitising your most precious tape.
DIY makes sense if you have fewer than 20 tapes, you’re comfortable troubleshooting technical problems, and you value the learning process.
Professional conversion benefits
Professional services like Showbiz Video Productions handle digitisation at scale with professional-grade capture cards, and dedicated video restoration software. They apply deinterlacing, colour correction, and noise reduction as standard. Showbiz Video Productions offers same-day turnaround for most jobs.
Professional services cost more per tape than DIY, but many charge a base fee plus per-tape pricing, making them economical for large collections. Showbiz Video Productions provides transparent pricing starting at AUD $6 per tape, with no hidden fees.
The real value is risk mitigation. Your original tapes remain safe in professional hands. They have experience with degraded media and know how to extract the best possible quality from tapes in poor condition.
Professional services are essential if your tapes show signs of advanced degradation, if you have rare or irreplaceable recordings, or if you need the work completed quickly.
Digital File Formats and Storage Solutions
The format you choose determines how easily you can access, share, and preserve your videos for decades to come.
Video formats explained
MP4 is the practical standard for most situations. It’s compatible with virtually every device and offers reasonable file sizes thanks to H.264 compression. MP4 is ideal if you want to share videos with family or watch them on multiple devices.
AVI is older but relevant for archival purposes. It supports lossless compression and preserves more original data than MP4. The trade-off is larger file sizes and reduced device compatibility.
MOV works best within Apple’s ecosystem. For mixed environments, MP4 is more practical.
Standard definition (640×480) is adequate for casual viewing but looks soft on modern large screens. 720p (1280×720) is the practical minimum for archival. 1080p is unnecessary for VHS source material; VHS resolution is inherently limited, and upscaling wastes storage without improving quality.
Frame rate should match the original tape’s standard. PAL (25 fps) was used in Australia; NTSC (29.97 fps) in North America.
Long-term digital preservation strategy
Storage redundancy is non-negotiable for irreplaceable recordings. Never rely on a single drive or cloud service. Use three copies: one on your primary computer, one on an external hard drive, and one in cloud storage (the "3-2-1 backup rule").
External hard drives are cheap insurance. A 4-terabyte drive costs under AUD $100 and holds hundreds of digitised tapes. Keep it disconnected from your computer except during backups.
Cloud storage provides geographic redundancy. Services like Google Drive, Dropbox, or OneDrive cost AUD $10-20 monthly for sufficient capacity.
Check your stored files annually by opening a few videos at random to confirm they play correctly. Document your files with a spreadsheet listing each video’s filename, original tape label, date range, and content description.
Troubleshooting Common Playback Issues
Most playback problems have straightforward fixes once you identify the cause.
Choppy or stuttering playback usually indicates your computer can’t keep up. Close unnecessary applications, reduce the capture resolution or bitrate, or upgrade to a faster computer.
Audio out of sync with video often results from capture software misalignment. Re-capture the tape at lower bitrate or resolution.
Horizontal lines or waves rolling through video usually indicate a tracking issue with the VCR. Adjust the tracking control while the tape is playing. If tracking adjustment doesn’t help, the tape may be warped or the playback head needs cleaning.
Distorted or shifted colours suggest dirty playback heads. Clean the head using a head cleaning cassette. If colours shift gradually, the tape is experiencing oxide degradation, which is permanent but can be minimised through colour correction.
Missing or quiet audio usually results from loose cable connections. Verify your capture software is set to record audio.
The capture device isn’t recognised by your computer. Restart your computer and try a different USB port. Check the manufacturer’s website for driver updates.
Video plays but is completely black, meaning no signal is reaching your capture device. Check all cable connections, particularly the video cable. Try a different cable to rule out a broken connector.
Digitising your VHS collection at home is entirely achievable with modest investment and patience. The process requires attention to detail, clean playback heads, secure cable connections, and appropriate software settings. However, if your tapes show signs of advanced degradation, if you have irreplaceable family recordings, or if you simply want the work done professionally without the learning curve, Showbiz Video Productions handles digitisation with professional-grade equipment and expert care. With over 20 years of experience and same-day service available for most jobs, they transform your aging tapes into high-quality digital files you can access on modern devices. Get a quote and let the professionals preserve your memories while you focus on what matters.
Frequently Asked Questions
What equipment do I need to digitize VHS tapes at home?
You'll need a VCR that works, a USB capture card or analogue-to-digital converter, RCA or S-Video cables, a computer with video capture software like OBS Studio, and external storage for your digital files. Some capture devices include software; others require you to source it separately. Check your computer's operating system compatibility before purchasing, as modern systems may need specific drivers or adapters.
How can I tell if my VHS tapes are too degraded to digitize?
Watch for visible signs of VHS tape degradation: white mould spots, sticky residue, tape warping, or a musty smell. Play a small section to check for severe signal noise, tracking problems, or colour loss. If the magnetic tape is severely degraded, playback may be impossible. However, even tapes with moderate wear can often be recovered by professional equipment with better playback heads and deinterlacing technology.
Is it worth digitizing old VHS tapes myself, or should I use a professional service?
DIY digitization costs £50-£200 in equipment but takes significant time and technical skill. Professional services handle tape cleaning, use professional-grade equipment with advanced deinterlacing and encoding, and provide archival-quality results in formats optimised for long-term storage. For irreplaceable family memories, professional conversion often justifies the cost through superior quality and faster turnaround.
What video format should I save my digitized tapes in?
MP4 is widely compatible and suitable for most playback devices. For archival quality and future-proofing, consider lossless compression formats or higher bitrate files. Store multiple copies on external hard drives and cloud storage to protect against data loss. Ensure your chosen codec and frame rate match your original tape's specifications for best results.
This article was written using GrandRanker