
Table of Contents
- Why Old Family Videos Are at Risk of Being Lost Forever
- The 3-2-1 Backup Rule: Your Blueprint for Preservation
- How to Digitise VHS to Digital Files: DIY vs Professional
- Cloud Storage vs External Hard Drive for Videos: Which Wins?
- Choosing the Right File Format and Settings
- Understanding the Cost of Professional Video Conversion
- Common Mistakes to Avoid and Long-Term File Checks
- Conclusion: Start Preserving Your Memories Today
- Frequently Asked Questions
Last Updated: September 7, 2026
Why Old Family Videos Are at Risk of Being Lost Forever
Magnetic tape is not a permanent medium. The VHS cassettes, camcorder tapes, and film reels stored in your cupboard are degrading right now, and the window to save them is narrower than most people realise. At Showbiz Video Productions, we’ve spent over 20 years watching families discover that their most treasured footage has become unplayable, which is why understanding the best way to preserve old family videos starts with acknowledging the urgency.
The physical degradation is relentless. Magnetic tape suffers from sticky shed syndrome, where the binder holding the magnetic particles breaks down and turns the tape into a sticky, unplayable mess (loc.gov). Even tapes stored perfectly can lose magnetic signal strength over time. Film reels face mould, vinegar syndrome, and colour fading. The playback equipment itself is also disappearing, making conversion harder each year.
Here’s the uncomfortable truth: if your tapes are from the 1990s or earlier, they may already be showing signs of decay. Many families only discover the damage when they finally try to play a tape and find the image is snowy, the audio is warped, or the tape snaps entirely.
Do not assume your tapes will last until you “get around to it.” Magnetic media has a finite lifespan, and every year of storage in a warm or humid environment accelerates the deterioration. Once the magnetic particles begin to shed, the footage may be unrecoverable.
The 3-2-1 Backup Rule: Your Blueprint for Preservation
The 3-2-1 backup rule is the gold standard for data preservation, and it applies perfectly to family video archives. The principle is simple: keep 3 copies of your data, on 2 different types of storage media, with 1 copy stored off-site. This strategy protects against hardware failure, theft, fire, and natural disasters.
For your digitised home movies, this means: one copy on your computer’s hard drive, one copy on an external hard drive or NAS (Network Attached Storage) device, and one copy in cloud storage or at a relative’s house. The off-site copy is the one most people skip, yet it is the only protection against a house fire or flood destroying your entire collection.
Data redundancy is not paranoia; it is standard practice in professional archiving. The Library of Congress digital preservation guidance emphasises that multiple copies across different storage types are essential for long-term preservation. No single storage medium is infallible, and the 3-2-1 rule acknowledges that reality.
How to Digitise VHS to Digital Files: DIY vs Professional
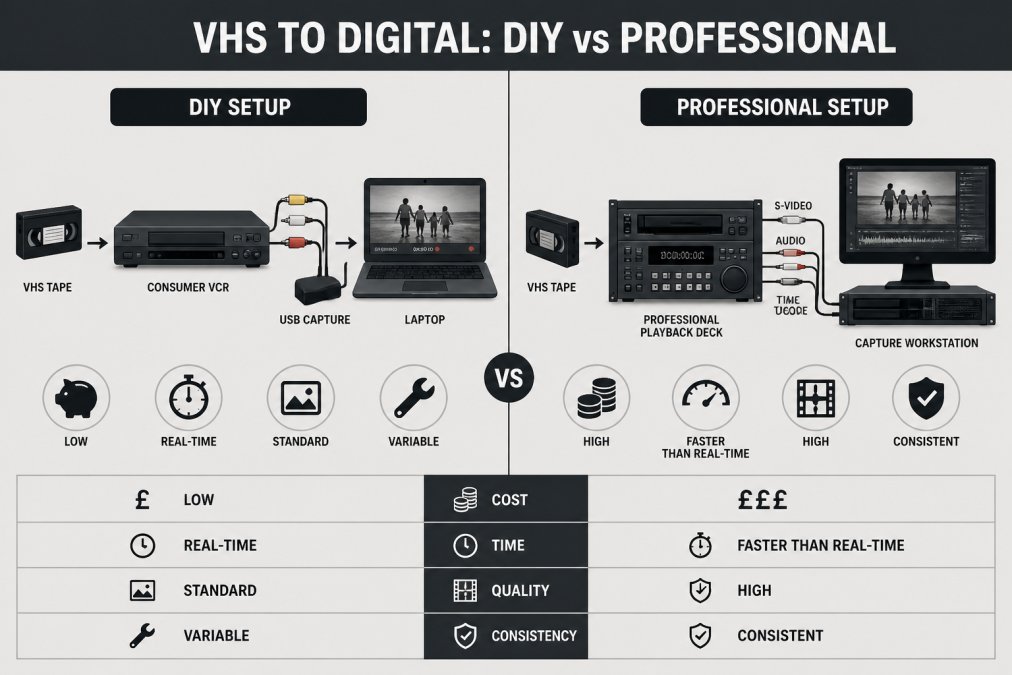
Deciding between a DIY setup and a professional service is the first major fork in the road. The right choice depends less on technical skill and more on your budget, the volume of tapes, and the condition of your media. To help you navigate this, we break down the two paths into a tiered workflow: a Zero-Budget DIY route and a Premium Professional route.
The Zero-Budget DIY Route: What You Actually Need
This path is viable if you have a handful of tapes, a working VCR, and more time than money. The core components are:
- A Playback Deck: Ideally, a hi-fi VCR from the late 1990s or 2000s, as these have better tracking and noise reduction than earlier models. If you don’t have one, check local classifieds or thrift stores, but be prepared to test it. A faulty deck can damage your tape.
- A Capture Device: You need an analog-to-digital converter. A common, reliable choice is a USB capture card that supports composite (RCA) and S-Video connections. The Elgato Video Capture is a popular consumer option, but many generic cards work fine. Avoid the cheapest no-name dongles, as they often introduce audio sync issues.
- Software: For free, open-source options, OBS Studio is excellent for capturing video. It allows you to record the input directly to a high-quality file. For cleaning up the capture, HandBrake is a free tool for transcoding, and Audacity can be used to clean up audio if you capture it separately.
- The Setup: Connect the VCR to the capture card using S-Video if available (it separates colour and brightness for a sharper image) and the red/white audio cables. In OBS, set the capture source to the USB device, and ensure the resolution is set to at least 480i (or 576i for PAL tapes). Record in a lossless or high-bitrate format like FFV1 or a high-bitrate MP4.
The Critical Caveat: This process is real-time. A 2-hour tape takes 2 hours to capture, and you must monitor it for dropouts or tracking errors. The biggest risk is that your consumer VCR’s playback head might be misaligned, producing a wobbly image that you won’t notice until you review the file. If you capture it poorly, you will have to re-do it, and each playback pass degrades the tape further.
The Premium Professional Route: When It’s Worth the Money
Professional services justify their cost by solving the two biggest problems with DIY: equipment quality and media condition.
- Professional-Grade Decks: Services use industrial VCRs like the Panasonic AG-1980 or JVC SR-MV50 models, which have far superior time-base correction and tracking. These machines can lock onto a signal that a consumer VCR would reject, pulling a stable image from a tape that appears to be snow on your TV.
- Media Cleaning and Repair: A professional will often bake a tape that suffers from sticky shed syndrome (where the binder has broken down) before playing it. They also clean the tape path and can sometimes splice a broken tape. This is a level of intervention that is impossible for a home user without risking total loss.
- Time and Volume: If you have 50 tapes, the DIY route represents 100+ hours of active monitoring. A professional service can process that volume in a week. When you value your time, the per-tape cost becomes a bargain.
A Hybrid Approach: The Middle Ground
For those with a moderate budget and a large collection, consider a hybrid strategy:
- Sort and Prioritise: Identify the tapes that are most likely to fail (e.g., those with visible mould or that smell like vinegar) and send those to a professional immediately.
- DIY the Rest: For tapes that play fine, use your DIY setup to capture them at a high bitrate. This saves money while ensuring the critical, fragile media is handled by experts.
- Use a Local Service for a Test: Send one tape to a professional service and compare the output quality to your DIY capture. This gives you a benchmark and helps you decide if the quality difference justifies the cost for the rest of your collection.
No matter which route you choose, the golden rule is to capture at the highest quality your equipment allows. You can always compress a high-quality file later, but you can never restore detail that was lost during a low-quality capture. For DIY, that means using a lossless codec like FFV1 for your master file, not just a standard MP4.
Cloud Storage vs External Hard Drive for Videos: Which Wins?
For the “2” and “1” parts of the backup rule, you need to choose your storage media. Comparing cloud storage vs external hard drive for videos is not about picking a winner; it is about understanding that each serves a distinct purpose in your backup strategy.
An external hard drive offers true ownership and offline protection. You pay once for the hardware, and your files are not subject to subscription fees or service shutdowns. The downsides are real: drives fail, they can be damaged or stolen, and they offer no protection against a house fire or flood. A drive sitting on your desk is not a backup; it is a second copy of the same vulnerability.
Cloud storage provides the critical off-site protection. Services like Google Photos and Dropbox automatically sync your files and protect them from local disasters. The trade-offs are ongoing subscription costs and dependence on a third party’s infrastructure. For most families, the answer is both: a local drive for immediate access and a cloud service for disaster recovery.
| Storage Option | Initial Cost | Ongoing Cost | Best For | Key Risk |
|---|---|---|---|---|
| External Hard Drive | One-time purchase | None | Primary local backup | Hardware failure, theft, fire |
| Cloud Storage | Free tier available | Monthly subscription | Off-site disaster recovery | Service shutdown, subscription fatigue |
| NAS (Network Attached Storage) | Higher upfront | Electricity, maintenance | Multi-device home access | Requires technical setup |
Choosing the Right File Format and Settings
The file format you choose today determines whether your grandchildren can watch these videos in 30 years. The best way to preserve old family videos is to prioritise open, widely supported formats over proprietary ones that may become obsolete.
For archival purposes, MP4 with the H.264 codec is the safest choice. It is universally supported across televisions, phones, computers, and editing software, and it offers excellent compression without visible quality loss. Avoid formats tied to specific software or hardware, as these can become unreadable when the technology disappears.
Resolution matters, but it is not the only consideration. Your source material is limited by what was recorded: a VHS tape contains roughly 240 lines of resolution regardless of how it is captured. Capturing at a higher resolution preserves the full detail of the source and allows for future enhancement, but it will not create detail that was never there. Focus on capturing the complete signal without dropouts or distortion.
Choose MP4 with H.264 for maximum compatibility, capture at the highest resolution your source allows, and always keep an uncompressed master copy of your most important footage.
Understanding the Cost of Professional Video Conversion
The cost of professional video conversion varies widely based on the format, the condition of the media, and the turnaround time you need. Many families assume professional service is unaffordable, but the pricing is often more accessible than expected. Some services, including Showbiz Video Productions, offer transparent per-item pricing that makes budgeting straightforward.
What you are paying for is expertise and equipment. A professional service maintains playback decks for formats that are no longer manufactured, employs technicians who can handle fragile or deteriorating media, and delivers files that are properly formatted and verified. The hidden cost of DIY is your time: capturing a single tape takes at least as long as the tape’s runtime, plus setup and troubleshooting.
When comparing options, consider what is included in the price. Does the service clean the tapes before capture? Do they provide the files on a USB drive, cloud download, or both? What happens if a tape is damaged? Professional services should handle your irreplaceable media with documented care procedures. For a detailed breakdown of current pricing, visit the Showbiz Video Productions website, where transparent rates are published for every format.
Common Mistakes to Avoid and Long-Term File Checks
Preserving your videos is not a one-time task; it is an ongoing commitment. The most common mistake is digitising tapes, storing the files on a single drive, and never checking them again. Digital files are susceptible to bit rot, a slow, silent degradation of the magnetic charge on a hard drive or the charge in a solid-state drive’s flash memory. This can cause data to corrupt without any visible warning. To combat this, you need a proactive maintenance routine that goes beyond just ‘opening a file.’
The Critical Mistake: Ignoring File Integrity (Bit Rot)
Most people assume that if a file is on a drive, it’s fine. In reality, a hard drive can develop bad sectors, and the data in those sectors becomes unreadable. The file system might not even flag it until you try to open the file and find it’s corrupted. The only way to know for sure is to verify the file’s checksum.
A checksum is a unique digital fingerprint of a file. By generating a checksum when you first save a file, you can later re-run the same algorithm to see if the file has changed. If the checksums don’t match, the file is corrupted.
How to Implement a Checksum Routine:
- Generate a Manifest: When you first create your archival files, use a tool like MD5 or SHA-1 (or the more modern SHA-256) to generate a checksum for each file. On Windows, you can use the built-in
certutilcommand; on macOS and Linux, you can use themd5orshasumcommand in the terminal. Save the output as a.md5or.sha256manifest file alongside your videos. - Verify Annually: Once a year, run the checksum verification tool against your manifest. This will scan every file and tell you if any have changed. This is the only reliable way to detect bit rot before it’s too late.
- Use a File Integrity Checker: For a more automated approach, consider software like HashCheck (Windows) or HashTree (macOS) which can integrate into your file manager. For large libraries, a tool like Rclone can be used to verify checksums on a schedule.
The Silent Threat: Legacy Codec Obsolescence
MP4 with H.264 is the current safe choice, but it is not a permanent one. The technology landscape changes, and what is ubiquitous today may be a legacy format in 20 years. The real risk is not that your file will be unreadable, but that the software and hardware needed to decode it will become scarce.
A Practical Future-Proofing Strategy:
- Keep a Master Copy in an Open Format: For your most important footage, consider keeping a master copy in a lossless or open-source format like FFV1 (which is designed for archival) or Motion JPEG 2000. These are less compressed and more likely to be supported by future archival tools.
- Monitor the Format Landscape: The National Film and Sound Archive of Australia preservation advice and the Library of Congress regularly publish guidance on sustainable file formats. Check these resources every few years to see if your chosen format is still recommended.
- Plan for Migration: Every 5-10 years, plan to re-export your files into the then-current recommended format. This is a normal part of digital preservation. The 3-2-1 rule applies to formats as much as it does to storage media.
A Concrete Maintenance Schedule
Here is a realistic, actionable schedule for the average family archive:
- Annually: Run a checksum verification on your primary and backup drives. Open and play a random sample of 5-10 files to check for visual or audio glitches.
- Every 2 Years: Check the health of your external drives using diagnostic software like CrystalDiskInfo (Windows) or DriveDx (macOS). Look for warning signs like reallocated sectors or high temperatures.
- Every 3-5 Years: Migrate your entire archive to new storage hardware. All drives have a finite lifespan, and proactive migration is cheaper than emergency data recovery.
- Every 5-10 Years: Review your file formats against current archival standards and re-export if necessary.
Never store your only copies on a USB flash drive. These drives are not designed for long-term archival storage and have a high failure rate. Use them for transfer, not preservation. Similarly, do not rely solely on a single external hard drive that sits on your desk; it is not a backup, it is a second copy of the same vulnerability.
Digitising is only the first step. True preservation requires a commitment to ongoing file integrity checks and a willingness to migrate your data to new formats and storage media over time. Set a recurring calendar reminder to perform these checks, and treat your digital archive with the same care you would a physical photo album.
Conclusion: Start Preserving Your Memories Today
The physical media holding your family’s history is degrading, and the playback equipment needed to read it is disappearing. The best way to preserve old family videos is to act now, digitise at the highest quality you can, and follow the 3-2-1 backup rule to protect your digital files for the long term. Whether you choose a DIY workflow or a professional service, the cost of inaction is the permanent loss of footage that can never be recreated.
At Showbiz Video Productions, we combine over 20 years of experience with professional-grade equipment to handle every format, from VHS and film reels to cassettes and vinyl. Our transparent pricing starts at just $6 per item, and our fast turnaround, including same-day service in most cases, means your memories are safe sooner. Rated 5 stars on Google, our team treats every tape as the irreplaceable record it is.
Get started with Showbiz Video Productions and preserve your family’s story for the next generation.
Frequently Asked Questions
What is the best way to preserve old VHS tapes before they deteriorate?
The best way to preserve old VHS tapes is to digitise them promptly, as magnetic tape degrades over time. Store tapes in a cool, dry environment with stable humidity while you arrange conversion. For the actual preservation, transfer the content to digital files using a professional service. Once digitised, apply the 3-2-1 backup rule: keep three copies, on two different storage types, with one copy stored off-site.
How long do magnetic tapes actually last?
Magnetic tapes like VHS and Hi8 have a lifespan of roughly 10 to 25 years under ideal conditions, but many fail sooner due to heat, humidity, and playback wear. Sticky shed syndrome, where the binder degrades, can make tapes unplayable. If your tapes are older than 15 years, they are in the high-risk zone. Professional digitisation captures the content before physical degradation makes playback impossible.
Is cloud storage or a hard drive better for family videos?
Neither option is better on its own; they serve different purposes in a preservation strategy. An external hard drive gives you fast, offline access and full control, but it can fail or be damaged. Cloud storage protects against physical disasters like fire or flood and allows easy sharing, but requires ongoing subscription fees. The most reliable approach is to use both, following the 3-2-1 backup rule for true data redundancy.
Can you digitise old, damaged VHS tapes that haven’t been played in years?
Yes, in most cases. Professional conversion services use commercial-grade playback equipment that handles tapes more gently than consumer VCRs. If a tape shows signs of mould or sticky shed syndrome, a technician can often clean it first. The success rate depends on the physical condition, but experts can frequently recover footage that seems unplayable. It is worth getting an assessment rather than assuming the tape is lost.