
Table of Contents
- Can Old VHS Tapes Be Repaired? Yes, But Know the Limits
- Common Types of VHS Tape Damage
- VHS Tape Mould Removal: Safe Cleaning Methods
- DIY Repair: Tools and Step-by-Step Guide
- Troubleshooting Playback Issues After Repair
- How to Digitise Old VHS Tapes for Long-Term Preservation
- When to Call a Professional: Risks of DIY Repair
- Understanding the Cost of VHS to Digital Conversion
- Frequently Asked Questions
Last Updated: September 8, 2026
Can Old VHS Tapes Be Repaired? Yes, But Know the Limits
Can old VHS tapes be repaired? The short answer is yes, many common physical faults can be fixed, but the tape itself degrades in ways that no repair can reverse. Magnetic tape is a fragile analog medium, and while a snapped or creased section can often be spliced back together, the signal loss from age, heat, or wear is permanent. At Showbiz Video Productions, our team has over 20 years of experience. The key distinction is between physical damage, which is often repairable, and chemical or magnetic degradation, which is not.
Common Types of VHS Tape Damage
The most frequent forms of VHS damage fall into two broad categories: physical trauma to the tape itself and environmental deterioration of the magnetic layer. Physical trauma includes snapped, torn, creased, or stretched tape, often caused by a faulty VCR mechanism. Environmental damage includes mould growth, sticky shed syndrome, and gradual signal loss from oxide shedding, all worsened by heat, humidity, and direct sunlight.
Snapped or Torn Magnetic Tape
A snapped tape is the most straightforward repair scenario. The break usually happens near the spool or along the tape path when the cassette is mishandled or the player misbehaves. If the break is clean and no footage is physically missing, a careful splice can restore playback. You must remove a small amount of tape at the break to ensure the ends are clean, losing a second or two of footage at the splice point.
Creased, Folded, or Stretched Tape
Creased tape is more problematic than a clean snap. When tape folds over itself, the magnetic coating is physically crushed, producing distorted playback even after flattening. Stretched tape, caused by a VCR pulling the tape under tension, suffers the same issue. Repairing these sections requires cutting them out entirely, removing the damaged footage. If the crease sits in an irreplaceable family moment, you face a choice between losing a few seconds or keeping a distorted few seconds.
VHS Tape Mould Removal: Safe Cleaning Methods
VHS tape mould removal is possible, but it demands patience and the right technique. Mould appears as white or grey powdery spots on the tape surface and housing, and it spreads easily to other tapes. Playing a mouldy tape without cleaning will contaminate the VCR heads. The safe method involves opening the cassette, gently wiping the tape with a lint-free cloth lightly dampened with isopropyl alcohol, and allowing it to dry completely before reassembly. Heavily moulded tape may be too far gone, as spores can eat into the magnetic binder layer. If unsure, professional assessment is safer, since mishandling mouldy media can damage your equipment.
DIY Repair: Tools and Step-by-Step Guide
Attempting a DIY repair is reasonable for a single snapped tape with sentimental value, but you must use the correct tools. A common mistake is clear adhesive tape, which bleeds adhesive onto the VCR mechanism and contaminates the playback heads, potentially destroying the machine and any other tape you play in it.
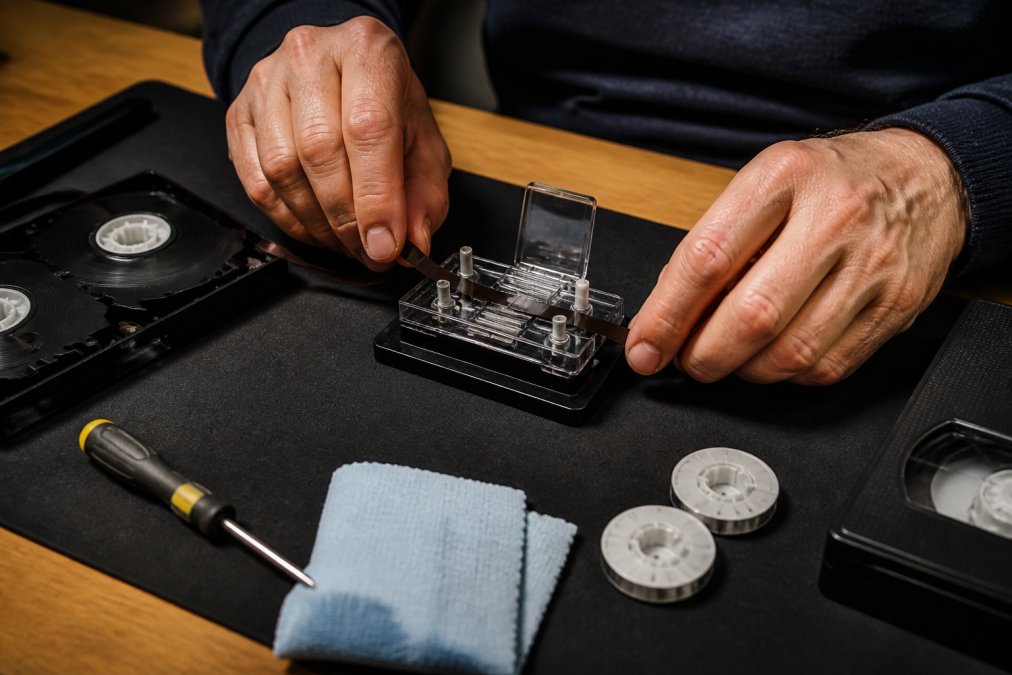
Tools Needed for Manual Tape Repair
You need a specific equipment list before opening a cassette. A small Phillips-head screwdriver opens the housing. A splicing block or splicing tape, a non-magnetic, low-residue tape designed for editing, makes the join. A lint-free cloth and isopropyl alcohol clean the tape path. Fine tweezers help handle the thin tape without leaving fingerprints or creases. Ordinary sticky tape, scissors, and bare hands will not produce a reliable splice.
Step-by-Step Splicing Process
- Remove the five screws on the cassette housing and lift the top cover to expose the spools.
- Locate the break and carefully pull a small amount of slack from both spools.
- Cut away any wrinkled, creased, or damaged tape on both sides of the break using a sharp blade on the splicing block.
- Overlap the two clean ends on the splicing block and apply a short piece of splicing tape across the join on the non-magnetic (shiny) side.
- Trim any excess splicing tape so the splice is no wider than the tape itself.
- Wind the tape gently back onto the take-up spool, ensuring it sits flat in the tape path.
- Reassemble the housing and test playback on a VCR you are willing to risk, ideally a spare machine.
Never use clear adhesive tape or any household sticky tape for a VHS splice. The adhesive leaks onto the video head drum and tape path, causing tracking issues, static, and permanent damage to the VCR mechanism that can ruin every tape played afterward.
Troubleshooting Playback Issues After Repair
A successful splice does not guarantee clean playback. Tracking issues, static, or frame drops often lie in tape path alignment rather than the splice itself. But a more serious risk most DIY guides overlook: a poorly repaired tape can damage the VCR’s playback heads. The head drum spins at 1,500 rpm, and any rough edge, adhesive residue, or wrinkle on the splice can scrape the head gap or shed oxide onto the drum, causing permanent head wear, tracking errors, and even a ‘head clog’ requiring professional cleaning or head replacement (ieee.org).
Before you assume the tape is faulty, work through this diagnostic sequence:
- Clean the VCR heads first. Use a chamois-tipped cleaning swab moistened with 99% isopropyl alcohol. Gently press the swab against the head drum and rotate it by hand, never apply vertical pressure. Allow 15 minutes for the alcohol to evaporate completely before playing any tape.
- Check the tape path for twists. Open the cassette and verify the tape runs flat from the supply spool, around the guide pins, and onto the take-up spool. A single half-twist will cause severe tracking instability.
- Inspect the splice under magnification. Use a jeweller’s loupe to confirm the splice is no wider than the tape itself and that no adhesive is exposed on the magnetic (shiny) side. Even a 0.5 mm overhang can catch on the tape guides.
- Test on a sacrificial VCR. If you have a spare machine, use it for the first playback. This protects your primary VCR from potential head damage while you verify the splice holds.
If the picture still breaks up after these checks, the splice may have introduced a thickness difference the VCR’s auto-tracking cannot compensate for. This points toward professional digitisation. A professional transfer service uses professional-grade equipment with adjustable tape tension and head alignment, which can often read a marginal splice a consumer VCR cannot.
A repaired tape that sheds oxide or has a rough splice can permanently damage the VCR’s video head drum. Head replacement typically costs more than professional tape transfer, so always test a repaired tape on a machine you are willing to risk.
Once playback is stable, the repair is only the beginning. Store the repaired cassette upright in a cool, dry environment at 15-20°C with 40-50% relative humidity, away from direct sunlight and magnetic fields. Replay the tape only once to verify the splice, then digitise it immediately. Every additional playback cycle stresses the splice point and accelerates oxide shedding.
How to Digitise Old VHS Tapes for Long-Term Preservation
Repairing a tape is only a temporary measure. Magnetic tape degrades every time it plays, and even a perfectly stored cassette loses signal strength over years. How to digitise old VHS tapes is the question that matters for long-term preservation, because a digital file does not degrade with each viewing. The process involves playing the repaired tape on a clean, calibrated VCR and capturing the output through a video converter into a digital format.
Digitisation is not just about plugging in a capture card. How you handle the tape before and during capture determines whether the splice holds and whether you extract the best possible signal. Follow this protocol:
- Acclimatise the tape. If the cassette has been stored in a cold garage or shed, let it reach room temperature in a sealed plastic bag for 2-3 hours. This prevents condensation from forming on the tape surface, which can cause oxide shedding and head clogs.
- Clean the cassette housing. Wipe the exterior with a lint-free cloth lightly dampened with isopropyl alcohol to remove dust and mould spores that could enter the mechanism.
- Play the tape once, fully. Do not fast-forward or rewind repeatedly. Each pass stresses the splice and the tape edges. Capture the entire content in a single playback session.
- Use a time-base corrector (TBC). A TBC stabilises the analogue signal and corrects timing errors from tape stretch or splice thickness variations. Many consumer capture devices lack this, which is why professional services produce cleaner results.
- Capture in a lossless format. Record to a high-bitrate format such as DV or a lossless codec like FFV1, rather than a compressed MP4. This preserves the maximum detail from the original analogue signal and gives you a master file for future editing.
Once digitised, the physical cassette becomes a backup rather than the primary copy. But do not discard it immediately. Store it upright in a polypropylene sleeve, in a cool, dry environment at 15-20°C with 40-50% relative humidity, away from direct sunlight, magnetic fields, and vibration. Avoid storing tapes flat, as stacked weight can deform the housing and increase the risk of re-snapping at the splice.
A professional transfer service uses professional-grade equipment and cleaning procedures to extract the best possible signal from ageing media. They handle the tape with the same care you would apply to a fragile heirloom, minimising re-damage during capture. For irreplaceable footage, this controlled environment is the safest way to get a clean digital master.
When to Call a Professional: Risks of DIY Repair
DIY repair carries real risks beyond a botched splice. Opening a cassette without a clean workspace invites contamination. Handling tape with bare fingers leaves oils that attract dust and promote mould. Most importantly, a poor splice or misaligned tape path can damage the VCR itself, and repair costs often exceed professional transfer. Professional service is the right call when you have many tapes, irreplaceable footage, mould, or lack playback equipment. A specialist can assess each tape, perform mould remediation, and digitise the content in one controlled process.
Understanding the Cost of VHS to Digital Conversion
The cost of VHS to digital conversion varies widely based on tape condition, quantity, and turnaround time. Many assume DIY is cheaper, but hidden costs of splicing tools, cleaning supplies, and a working VCR add up quickly. Professional services typically price per tape, with discounts for larger batches, delivered on a modern format. At Showbiz Video Productions, we offer transparent pricing that scales with order size, with no minimum order. Our turnaround includes same-day service in most cases. We handle mixed formats too, including VHS, film reels, cassettes, and vinyl.
A repaired VHS tape is still a degrading analog medium. The only way to truly preserve the footage is digitisation, which converts the content to a stable digital file that will not degrade with playback or age.
The decision comes down to what your tapes are worth to you. A single snapped tape with footage of a birthday party may justify a careful DIY splice, but a collection of irreplaceable family history deserves professional handling that protects both the tape and the playback equipment. Guidance on handling and storing magnetic media from the National Library of Australia reinforces that proper storage and timely digitisation are the only reliable safeguards for analog recordings. Resources on preserving personal audiovisual collections also note that playback itself accelerates tape degradation. Trust our expert team with over 20 years of experience to handle your precious media with care, using professional-grade equipment and same-day turnaround where possible. Get a quote from Showbiz Video Productions and give your family memories the preservation they deserve.
Frequently Asked Questions
Can old VHS tapes be repaired if the film is snapped?
Yes, a snapped tape can often be repaired using a splicing block and non-magnetic splicing tape. The process involves cutting the broken ends cleanly and joining them with a precisely placed splice. This fix can work well, though you may notice a brief glitch or frame drop where the splice occurs. For valuable family footage, a professional service can perform this repair and immediately digitise the tape, reducing the risk of further damage during playback.
Is it worth repairing a VHS tape or should I digitise it?
Repairing a tape is only worthwhile if it allows you to play and capture the content. The goal is digitisation, as VHS tape degrades with each playback. If the tape is snapped or creased, a repair is necessary before conversion. For tapes that play but show signal loss or static, skip the physical repair and focus on a clean playback and capture. Professional services can assess the damage and advise whether a repair or direct transfer is the better path.
Can mouldy VHS tapes be cleaned and restored?
Mould on VHS tapes is serious and should not be played, as spores can spread to your VCR and other tapes. Cleaning involves carefully opening the cassette and wiping the tape’s backside with a lint-free cloth and isopropyl alcohol. This is a delicate process requiring a steady hand. If the mould is extensive, professional restoration is safer. After cleaning, digitise the tape promptly to prevent the mould from returning.
What is the average lifespan of a VHS tape?
A standard VHS tape has an expected lifespan of 10 to 25 years when stored properly in a cool, dry environment. Tapes stored in attics or sheds degrade faster due to heat and humidity. Symptoms of degradation include tape degradation, tracking issues, and signal loss. Because the magnetic tape degrades over time, converting your footage to digital format is the most reliable way to preserve family memories beyond this limited lifespan.