
Table of Contents
- Risk 1: Irreversible Physical Damage to Fragile Film Reels
- Risk 2: Vinegar Syndrome and Advanced Degradation
- Risk 3: DIY Equipment Failures and Sprocket Damage
- Risk 4: Poor Storage Environments Accelerate Media Decay
- Risk 5: Software and Codec Compatibility Nightmares
- Risk 6: DIY vs Professional Video Transfer: What You Sacrifice at Home
- Risk 7: The Hidden Cost of Professional Film Digitisation vs DIY
- When to Stop and Call a Professional
- Frequently Asked Questions
Last Updated: September 23, 2026
Risk 1: Irreversible Physical Damage to Fragile Film Reels
The first and most serious of the 7 risks of converting old film at home is permanent, irreversible damage to the original reel. Film is a physical medium, and every pass through a machine is a chance to destroy what you are trying to save.
Old film becomes brittle as its base material breaks down. A home projector or cheap capture rig pulls the film through under tension. If a splice is weak or a sprocket hole is torn, that tension snaps the film, and the frame is gone forever.
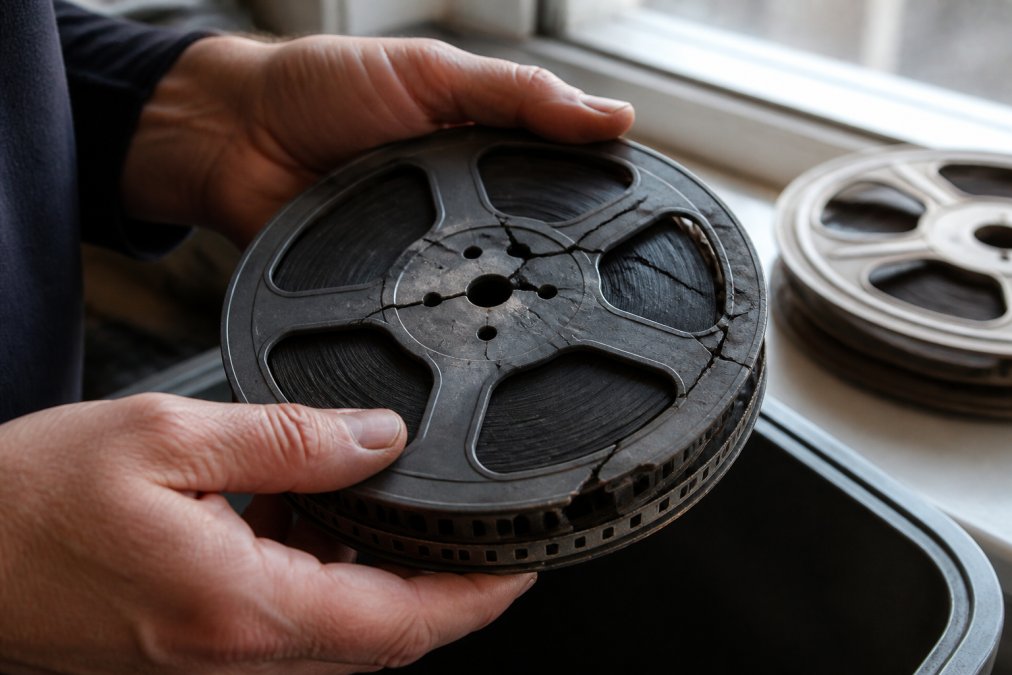
At Showbiz Video Productions, we handle aged stock on professional-grade equipment that controls tension and speed. That control is the difference between a clean transfer and a shredded reel.
Never test-run a fragile reel on a projector “just to see if it works.” One bad pass can tear sprocket holes and break splices, and those frames cannot be recovered.
Risk 2: Vinegar Syndrome and Advanced Degradation
Vinegar syndrome is the chemical breakdown of acetate film stock, named for the sour vinegar smell it releases. It is a one-way process, and once it starts, the film cannot be restored to its original state.
The damage shows up as warping, shrinking, and a distinctive odour. Shrunken film no longer fits the sprockets or the projection gate correctly, which is exactly when a DIY setup does the most harm. The film jams, the gate scratches the emulsion, and colour fades further.
Many people only notice the smell after the reel has already begun to deteriorate. Storing affected reels with healthy ones can spread the problem, so isolation matters.
Store suspect reels separately and in a cool, dry place. If you can smell vinegar, the degradation is already advanced, and the reel needs professional handling before it is played again.
Risk 3: DIY Equipment Failures and Sprocket Damage
Home transfer gadgets are built to a price, and their weakest point is film transport. Cheap units lack the tension control and gate precision that fragile stock demands.
When a sprocket fails to engage cleanly, it tears the perforations along the edge of the film. Once those holes are gone, the film can no longer be driven through any machine without specialist repair. The projection gate is another common failure point: a misaligned gate scratches the image surface frame after frame.
Common equipment problems include:
- Sprockets that slip and tear perforations
- Gates that scratch the emulsion as film passes through
- Motors that run at inconsistent speeds, causing judder
- Poor take-up tension that stretches or snaps the film
A professional transfer service uses equipment designed to protect the original while capturing it. That is the core of the DIY vs professional video transfer decision.
Risk 4: Poor Storage Environments Accelerate Media Decay
The conditions you store film and magnetic tape in decide how fast they decay. Heat, humidity, dust, and light all speed up degradation, and most homes are far from ideal. This is the section where the difference between slowing decay and triggering irreversible damage is decided.
Film reels are vulnerable on two fronts. Acetate-based stock absorbs moisture from humid air, which accelerates the hydrolysis reaction behind vinegar syndrome. Once the acetic acid starts to form, it catalyses further breakdown, the process feeds itself. Damp conditions also encourage mould, which digests the gelatin emulsion and leaves permanent etching. Dry air, by contrast, makes the film base brittle and prone to cracking, and repeated temperature swings cause the base and emulsion to expand and contract at different rates, stressing the bond between them.
Magnetic tape fails differently. The binder layer that holds the magnetic particles to the plastic base can absorb moisture and become sticky, a condition often called sticky-shed syndrome, which sheds oxide onto tape heads and destroys the signal on playback. Magnetic fields from nearby speakers, motors, or even some household appliances can corrupt or erase the recording. Tape also suffers from print-through, where the magnetic signal bleeds between adjacent layers on the reel over time.
A common pattern is that people store film and tape together in the same cupboard, treating them as one problem. They are not. Film needs cool, dry, stable conditions with some airflow to prevent mould. Tape needs similar conditions but also protection from magnetic fields and from the physical stress of being wound unevenly.
National Archives of Australia guidance on caring for audiovisual collections sets out the temperature and humidity ranges that slow decay. Most homes cannot hold those conditions year-round, which is why isolation and monitoring matter as much as the storage location itself.
Store suspect reels and tapes separately from healthy ones, label them with the date you noticed any smell or stickiness, and check them every few months. If you can smell vinegar or see mould, the degradation is already advanced, isolate the item and seek professional handling before playing it again.
The unique point most guides skip: storage damage is often invisible until it is irreversible. A reel that looks fine can already have shrunken, warped, or mould-affected sections that only reveal themselves when the film is run through a machine. By then, the damage is done.
Risk 5: Software and Codec Compatibility Nightmares
Even if you get a clean capture, the file you end up with may not play on anything you own. Codec and format choices made during a DIY transfer often create files that are hard to open, edit, or share, and the problem compounds over time as software and hardware evolve.
The issue is the chain of software involved. The capture device writes one format, the editing software reads another, and the final export uses a third. Mismatches produce dropped frames, audio drift, or files that simply refuse to open. Worse, many consumer capture devices default to proprietary or heavily compressed formats that lock your footage to a single ecosystem.
Common compatibility issues include:
- Proprietary formats locked to one piece of software or a single brand’s app
- Lossy compression that throws away detail you can never get back
- Bitrate set too low, producing blocky, soft images
- Frame rate mismatches that cause stutter on modern screens
- Container formats that newer operating systems no longer support natively
The future-proofing angle most guides miss: the real risk is not just whether a file plays today, but whether it will play in ten or twenty years. Codecs that were standard a decade ago, such as certain early MPEG variants or proprietary camera formats, are now difficult to open without specialist software. Archival practice favours open, well-documented formats with lossless or visually lossless compression, stored alongside checksums so you can verify the file has not corrupted.
A sensible DIY approach is to capture to a lossless or high-bitrate intermediate format, then export a preservation master in an open container with an open codec, plus a smaller access copy for everyday viewing.
Do not rely on a single proprietary app to open your archive. If the app is discontinued or the licence lapses, your footage can become effectively inaccessible even though the file still exists.
Get this wrong and the transfer is technically “done” but practically useless. Get it right and you have a file that will still open when today’s software is long gone.
Risk 6: DIY vs Professional Video Transfer: What You Sacrifice at Home
The gap between a home capture and a professional transfer is not just about equipment. It is about what happens to the image and the original along the way.
| Factor | DIY at Home | Professional Transfer |
|---|---|---|
| Film handling | High risk of tearing | Controlled tension, protected |
| Image capture | Filmed off a screen | Frame-by-frame scanning |
| Colour correction | Rarely possible | Included in the process |
| Output format | Often proprietary | Lossless, archival quality |
| Original condition | May be damaged | Preserved for the future |
Risk 7: The Hidden Cost of Professional Film Digitisation vs DIY
The cost of professional film digitisation looks higher on paper than a cheap home kit. The hidden costs of DIY are what most people miss.
When to Stop and Call a Professional
Stop and call a professional the moment a reel smells of vinegar, feels brittle, shows torn sprocket holes, or has visible mould. Those are signs that the media is already fragile, and a home setup will likely finish it off.
Frequently Asked Questions
Can DIY film conversion damage fragile vintage reels?
Yes. Old film becomes brittle and warped over time. Feeding a fragile reel through a home projector or scanner can snap the film, tear sprocket holes, or scratch the emulsion. Once that damage occurs, it is permanent. Professional services use specialised equipment that handles fragile film gently, reducing the risk of irreversible harm during old film conversion.
Is it better to digitise old film reels professionally or at home?
For fragile, warped, or mouldy film, professional digitisation is safer. A home setup cannot match the gentle handling, frame-by-frame scanning, and colour correction that a professional service provides. The DIY vs professional video transfer decision often comes down to the condition of your film. If reels are brittle or show vinegar syndrome, professional handling prevents further degradation.
What is the most common cause of video degradation during home transfer?
Improper cleaning and handling are the leading causes. Using the wrong cleaning solution or rough cloths can scratch film. Home projectors with worn sprockets tear perforations. Magnetic tape can stretch or snap in cheap VCRs. These issues accelerate degradation rather than preserve your media.
How do professional digitisation services differ from home setups?
Professional services use archival-grade scanners, humidity-controlled rooms, and frame-by-frame capture. They clean film with approved solutions, repair splices, and apply colour correction. The cost of professional film digitisation reflects this equipment, expertise, and quality control. Home setups often produce lower resolution, compressed files, and risk physical damage to irreplaceable reels.
What resolution should I digitise VHS tapes and film reels at?
For VHS, capture at least 720×576 (PAL) to preserve detail. For 8mm and Super 8 film, scan at a minimum of 2K resolution to capture the full frame. Higher resolutions like 4K help with restoration and future-proofing. Professional services typically deliver archival-quality files at these standards, while home equipment often maxes out at lower settings.