
Table of Contents
- What You Need to Transfer Cassettes to Computer
- Step 1: Connect Your Cassette Deck or Converter
- Step 2: How to Clean Cassette Tape Heads First
- Step 3: Set Up the Best Software for Digitising Audio
- Step 4: Record and Capture the Audio
- Step 5: Choose the Right Audio File Formats for Archiving
- Cleaning Up Your Recordings After Transfer
- Step 1: Capture a Noise Profile Before You Start
- Step 2: Apply Noise Reduction with Restraint
- Step 3: Remove Clicks and Pops
- Step 4: Apply a High-Pass Filter for Rumble
- Step 5: Normalise to a Consistent Level
- Step 6: Optional Equalisation to Restore High Frequencies
- Batch Processing for Large Collections
- The Takeaway
- When to Consider Professional Cassette Digitisation Services
- Frequently Asked Questions
Last Updated: September 5, 2026
Cassette tapes degrade with every playback, and the players that read them become harder to find each year. Transferring them to a computer is the only reliable way to preserve the audio before magnetic decay and physical wear take their toll. This guide from Showbiz Video Productions walks through the complete workflow, from connecting the hardware to restoring the final files.
What You Need to Transfer Cassettes to Computer
Digitising a cassette requires three core components: a playback deck, a way to get the analogue signal into your computer, and recording software. A common mistake is assuming the microphone input will work. It will capture audio, but the quality is poor and the levels are unreliable. The correct approach uses the line-in connection or a USB audio interface.
You need a working cassette deck or portable player with RCA or 3.5mm output jacks. Most modern laptops lack a line-in port, so a USB audio interface or a dedicated cassette-to-USB converter bridges the gap between the analogue output and the digital input. RCA cables connect the deck to the converter, and a USB cable connects the converter to the computer. If you have an older desktop with a line-in port, a 3.5mm stereo mini jack cable works, but the built-in sound card often adds noise.
| Component | Purpose | Typical Connection |
|---|---|---|
| Cassette deck or player | Plays the tape | RCA or 3.5mm output |
| USB audio interface or converter | Converts analogue signal to digital | RCA input, USB output |
| Recording software | Captures and saves the audio | Runs on the computer |
| Cables | Carry the signal between devices | RCA, 3.5mm, USB |
Step 1: Connect Your Cassette Deck or Converter
Start by connecting the cassette deck output to the audio interface input using RCA cables. Match the colours: white to white for the left channel, red to red for the right. If your deck only has a headphone jack, use a 3.5mm stereo mini jack to RCA cable instead. Plug the interface into your computer via USB and wait for the driver installation to finish before proceeding.
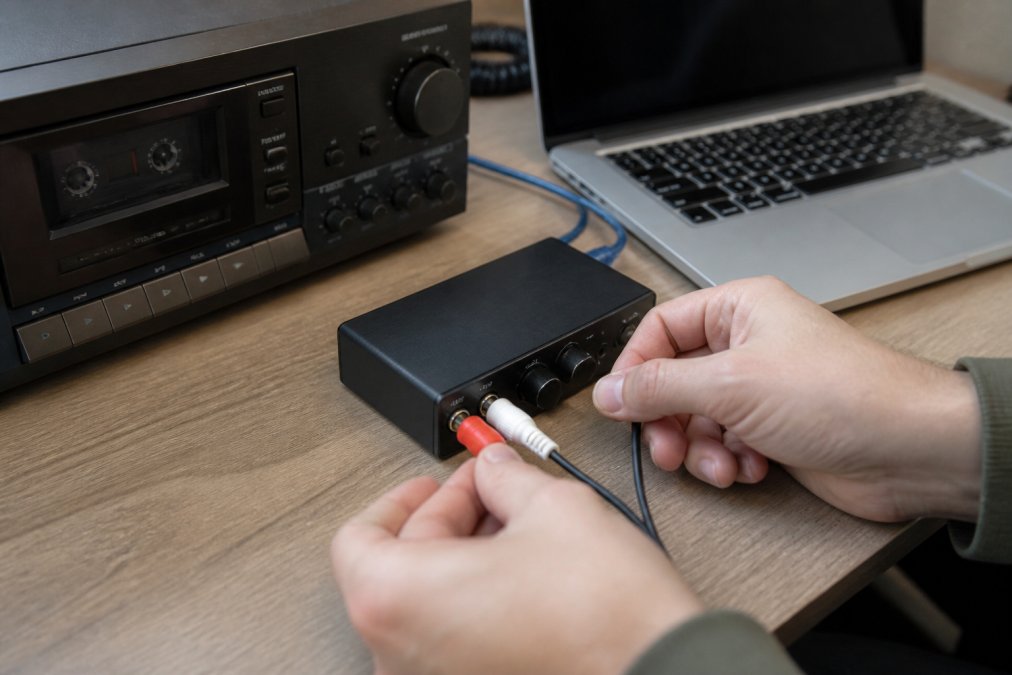
Many USB audio interfaces work without extra drivers, but some budget converters require specific software. Check the manufacturer’s documentation before you begin. If your computer does not recognise the device, try a different USB port and confirm the interface is set as the default input device in your system sound settings. Incorrect driver selection causes dropouts and distorted audio.
Step 2: How to Clean Cassette Tape Heads First
Cleaning the tape heads before playback is the single most important step for capturing clear audio. Oxide shed from old tapes accumulates on the heads and causes muffled high frequencies and uneven volume. Use isopropyl alcohol at 90 percent or higher on a cotton swab and gently wipe the playback head, the pinch roller, and the capstan (loc.gov). Allow the alcohol to evaporate completely before inserting a tape.
Demagnetising the heads matters too, although it is often overlooked. Heads build up a magnetic charge over time, which adds a constant background hiss to recordings. A hand-held demagnetiser is inexpensive and simple to use. Skipping this step produces recordings that require significant restoration later.
Step 3: Set Up the Best Software for Digitising Audio
The best software for digitising audio is free, reliable, and gives you control over input levels. Audacity is the most widely used option because it runs on Windows, macOS, and Linux, and it records directly from any connected interface. Ocenaudio offers a simpler interface with the same core recording functions.
Configure the software before you press record. Set the input device to your USB interface rather than the built-in microphone. Choose a sampling rate of 44.1 kHz and a bit depth of 16-bit for standard CD-quality audio, or 48 kHz and 24-bit if you plan to do heavy post-processing (edu). The recording software only captures what the hardware sends, so a clean signal path matters more than which program you choose.
Set your software to record in mono if you are digitising a spoken-word tape recorded on a single track. It halves the file size and avoids phase issues that make voice sound hollow.
Step 4: Record and Capture the Audio
Press play on the cassette deck and watch the level meters in your software. Adjust the input gain so the loudest peaks reach around -6 dB and never touch 0 dB. Clipping at this stage ruins the recording permanently, and no amount of post-processing can repair digitally clipped audio.
Start the recording in your software, then press play on the deck. Let the tape run for a few seconds of silence before the audio begins, this leader section gives you clean noise floor for noise reduction later. Record the entire side in one take rather than stopping between tracks; track splitting is easier after the transfer. When the side finishes, stop the software recording before you stop the deck.
Step 5: Choose the Right Audio File Formats for Archiving
Save your recordings as WAV files for the master archive. WAV is an uncompressed format that preserves every detail of the transfer with no file compression losses. It is the standard for archival work because it can be converted to any other format without quality loss. A 60-minute cassette side at 44.1 kHz and 16-bit produces a file around 600 MB, so plan your storage accordingly (soundonsound.com).
MP3 is the right choice for everyday listening and sharing, but it should never be the only copy you keep. A 320 kbps MP3 sounds nearly identical to the WAV on most playback systems while taking a fraction of the space. Keep the WAV master and generate MP3 copies for your phone, car, or family members. The master file is your insurance policy against future format changes.
Organising Your Digital Library: Metadata and Tagging
Most guides stop at the file format decision, but a box of cassettes digitised into files named SideA_001.wav is nearly as inaccessible as the tapes themselves. The missing step is metadata, the information that makes your files searchable, sortable, and presentable in any modern music player or media server.
Add ID3 Tags to Your MP3 Files
ID3 tags are the standard metadata format for MP3 files. They store the artist name, album title, track number, year, and genre. Free tools like Mp3tag (available for Windows and macOS) make this process fast, even for large collections. The workflow is simple: load your MP3 files, select them all, and fill in the common fields. For a cassette of a family reunion, set the artist as the family surname, the album as Cassette Archive 1987, and each track as a different segment of the recording.
Embed Album Art
Album art is not just cosmetic, it is how your brain recognises a recording in a visual interface. For commercial music tapes, find the original cover art online and embed it using Mp3tag. For home recordings, create a simple image file with a label like Smith Family Christmas 1992 and attach it to every track. The image should be square, at least 500×500 pixels, and saved as a JPG or PNG under 1 MB.
Use FLAC Instead of MP3 for Archival Listening Copies
If you want a compressed format that still supports rich metadata and lossless quality, consider FLAC (Free Lossless Audio Codec) for your everyday listening copies instead of MP3. FLAC files are typically 50-60 percent smaller than WAV but retain every bit of audio information. They support embedded album art and full metadata natively. Most modern players, including VLC, Foobar2000, and Plex, handle FLAC without issue. The trade-off is that FLAC is not as universally compatible as MP3, older car stereos and some portable devices will not play it. A practical strategy is to keep the WAV master, create FLAC copies for your home media server, and generate MP3 files only for devices with limited format support.
Split Your Recordings into Individual Tracks
If you recorded an entire side as one continuous file, split it into individual tracks before tagging. Audacity’s Analyze > Sound Finder tool can detect silences between songs and insert labels automatically. Adjust the silence threshold and minimum duration settings to match your tape, music tapes typically have 1-2 seconds of silence between tracks, while live recordings may have none. Once the labels are in place, use File > Export Multiple to export each labelled section as a separate file. Name the files with a consistent pattern like 01 - Track Title so they sort correctly.
A Practical Tagging Workflow
For a single tape with 10 tracks, the entire tagging process takes about 10 minutes. Load the MP3s into Mp3tag, select all tracks, set the album, year, and artist fields, then edit each track individually for the title and track number. Add the album art once and apply it to all tracks. For a collection of 50 tapes, batch it by processing one tape at a time. The payoff is a digital library where you can search for Dad's 60th birthday or Beach tape 1989 and find the exact recording in seconds.
The WAV master is your safety net, but the MP3 or FLAC copies with proper metadata are what make your archive usable. A well-tagged digital library means you will actually listen to these recordings again, which is the entire point of preserving them.
Cleaning Up Your Recordings After Transfer
Raw transfers contain tape hiss, clicks, and the dull frequency response common to cassette recordings. The difference between an acceptable transfer and a great one is what you do after the recording finishes. The goal is not to make your tapes sound like modern studio recordings, it is to remove the artefacts of the medium while preserving the original character of the performance.
Step 1: Capture a Noise Profile Before You Start
If you followed the recording workflow correctly, you already have a few seconds of leader silence at the start of your file. This is not dead air, it is your noise profile. In Audacity, highlight that section of silence, then go to Effect > Noise Reduction and Repair > Noise Reduction, and click Get Noise Profile. This samples the exact hiss, hum, and room tone from your specific tape and playback chain, which is far more accurate than a generic preset.
Step 2: Apply Noise Reduction with Restraint
The most common mistake is over-reducing noise, which produces a “watery” or “underwater” artefact called spectral smoothing. In Audacity, select the entire track, reopen the Noise Reduction effect, and set the reduction amount to between 6 dB and 12 dB. Start low, you can always apply a second pass, but you cannot undo a heavy first pass without re-recording. If you hear the background “swell” or pump, your reduction is too aggressive. A good rule of thumb is that the hiss should be noticeably quieter, but you should still be able to hear it faintly if you turn the volume up.
Step 3: Remove Clicks and Pops
Cassette playback often introduces short, sharp clicks from dust particles or oxide shedding on the tape path. These are distinct from hiss and require a different tool. Audacity’s Repair effect (under Effect > Noise Reduction and Repair) works well for single, isolated clicks. Zoom in on the waveform, find the spike, select a tiny region around it (about 0.01 seconds), and apply the Repair effect. For a full side with dozens of clicks, the Click Removal effect can process the whole track, but check its work carefully, it can sometimes remove the attack of a snare drum or a plosive on vocals.
Step 4: Apply a High-Pass Filter for Rumble
Cassette decks and the original recording chain often introduce low-frequency rumble below 40 Hz, from the motor, the tape transport, or the room where the original recording was made. This rumble is inaudible on small speakers but becomes obvious on headphones or a good stereo system. Apply a high-pass filter at 30 Hz with a gentle slope (12 dB per octave) to remove it. Do not go higher than 40 Hz unless you are dealing with a specific hum problem, because cassette bass response is already limited.
Step 5: Normalise to a Consistent Level
Cassette tapes were recorded at varying levels, and different sides of the same tape can differ noticeably. Normalisation brings the peak level of your file to a consistent target. In Audacity, use Effect > Volume and Compression > Normalize. Set the peak to -1.0 dB to leave headroom and avoid inter-sample peaks that cause clipping on playback. If you are processing a whole album worth of transfers, normalise every track to the same peak level. For a more sophisticated approach, use Loudness Normalization to target an integrated loudness of around -16 LUFS for music or -19 LUFS for spoken word.
Step 6: Optional Equalisation to Restore High Frequencies
Cassette tapes, especially those recorded on consumer decks, often have a rolled-off high end above 10 kHz. After noise reduction, you may find the audio sounds slightly dull. A gentle shelf boost of 2-3 dB above 10 kHz can restore air and presence. Use a high-shelf filter rather than a peaking EQ, and avoid boosting above 12 kHz, where tape hiss lives. Always apply EQ after noise reduction, never before.
Avoid aggressive processing. Over-processed audio introduces artefacts that are harder to listen to than the original hiss. If you find yourself applying more than three effects, step back and listen to the original again. Sometimes the most honest transfer is the one with a little tape hiss intact.
Batch Processing for Large Collections
If you are digitising dozens of tapes, Audacity supports macros (formerly chains) that let you record a sequence of effects and apply them to multiple files. Create a macro that applies your noise profile, high-pass filter, and normalisation in one pass. For files that need different noise profiles, process them in groups that share similar tape stock or recording conditions. The free tool SoX also offers command-line batch processing for users comfortable with scripting, which is the fastest route for very large collections.
The Takeaway
A cleaned transfer should sound like a well-mastered recording from the era the tape was made, not like a sterile digital file. The hiss reduction removes the distraction, the high-pass filter cleans the bottom end, and normalisation makes the level consistent. Spend the extra 15 minutes per side, it is the difference between archiving a tape and preserving a memory you will actually want to listen to.
When to Consider Professional Cassette Digitisation Services
A do-it-yourself transfer works well for a handful of tapes, but it gets complicated at scale. Large collections require hours of playback time, and each tape needs individual attention for cleaning, level setting, and post-processing. The risk of damaging an irreplaceable recording during setup mistakes is real. Professional services use calibrated playback equipment and handle the entire workflow.
At Showbiz Video Productions, we have transferred thousands of cassettes over more than 20 years of operation. Our professional-grade equipment handles tapes that consumer decks cannot read, and we offer fast turnaround, including same-day service in most cases. Every transfer is cleaned, restored, and delivered in the format you need for modern playback. If you have a large collection or tapes that have sat untouched for decades, sending them to a specialist protects your memories and saves you hours of fiddly work. Get a quote and let us handle the rest.
Frequently Asked Questions
What is the best way to transfer cassette tapes to a computer?
The best method is to connect a good quality cassette deck to your computer using an audio interface or a USB converter. Using the line-in port on your sound card provides a cleaner signal than the microphone input. This approach gives you more control over the recording levels and results in a higher quality digital file compared to using a cheap all-in-one converter.
What equipment do I need to digitise cassette tapes?
You need a cassette player or deck, a way to connect it to your computer, and audio recording software. For the connection, you can use a USB cassette converter for simplicity or a higher-quality setup with a separate audio interface and RCA cables. Your computer needs a line-in port, which is often missing on modern laptops, making an external USB device necessary.
What audio file format should I use for archiving?
For archiving purposes, you should record in WAV format at a 44.1 kHz sampling rate and 16-bit depth. This uncompressed format preserves all the audio data from the tape without quality loss. You can then create MP3 copies for everyday listening on portable devices, keeping the WAV file as your master archive copy.
Can I clean up the audio quality after transferring cassettes?
Yes, you can improve the audio after transferring. Use software like Audacity or Adobe Audition to remove hiss, clicks, and pops. You can also use the ‘Normalize’ effect to boost the overall volume to a consistent level. These tools help reduce the noise floor and make your old recordings sound clearer.
This article was written using GrandRanker