
Table of Contents
- Why Safe Digitization of VHS Tapes Matters
- Assessing Your VHS Tapes Before Digitization
- VHS Tape Preservation Tips Before You Start
- Step-by-Step: How to Digitize Your VHS Tapes
- Choosing the Best VHS to Digital Converter for Your Needs
- Understanding the Cost of Professional VHS Conversion
- Digital File Formats and Quality Preservation
- Post-Digitization: Storage and Backup
- Frequently Asked Questions
Last Updated: September 28, 2026
Why Safe Digitization of VHS Tapes Matters
Your old VHS tapes are deteriorating right now. Every year they sit in a box, the magnetic particles on the tape degrade further. Temperature swings, humidity, and dust all speed up the damage. The only way to preserve what’s on them is to digitize VHS tapes safely before it’s too late.
Many families have boxes of irreplaceable memories on tape. Birthday parties from the 90s. School recitals. Holiday gatherings. Once a tape fails, that content is gone forever. Digital files, by contrast, can be backed up, shared, and accessed for decades without degradation.
Safe digitization means more than just pressing play and hitting record. It means using proper equipment, handling tapes correctly, and saving files in formats that won’t become obsolete. At Showbiz Video Productions, we’ve helped families rescue memories that would otherwise be lost.
The stakes are high. But the process doesn’t have to be complicated.
Assessing Your VHS Tapes Before Digitization
Before you start digitizing, inspect your collection. Not all tapes are in the same condition. Some may be salvageable with care. Others need professional attention.
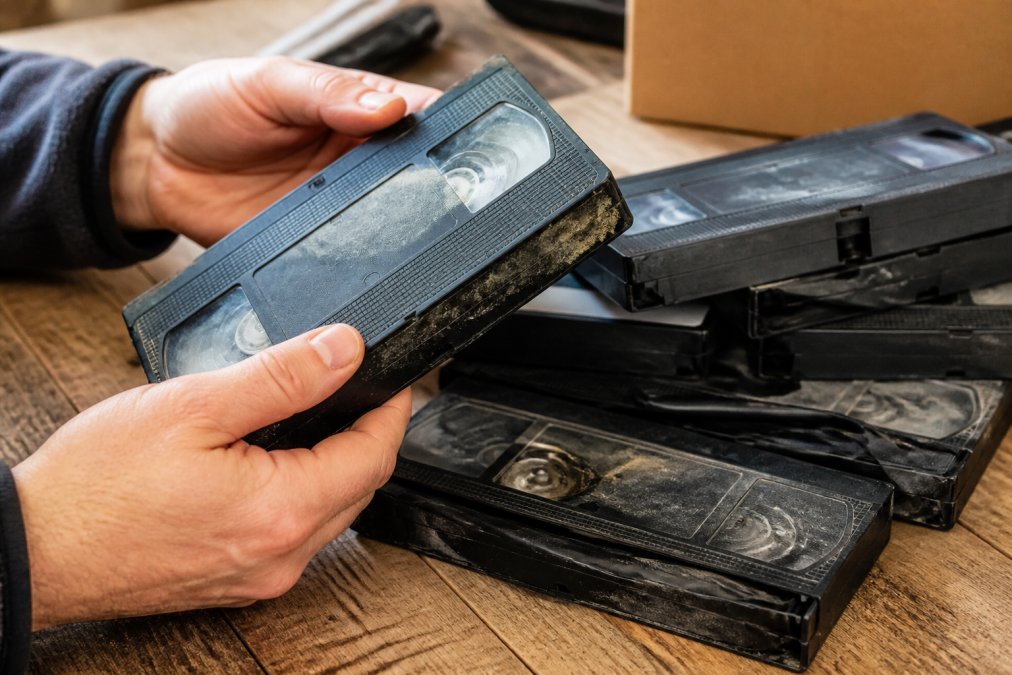
Signs of tape degradation
Look for these warning signs:
- Visible mold or discolouration on the cassette or tape itself
- Tape warping, the cassette feels loose or the tape visibly bends inside
- Sticky residue on the reels or inside the case
- Flaking or peeling of the magnetic coating
- Broken or missing parts of the cassette housing
If you see mold, handle the tape carefully. Mold spores can spread. Store affected tapes separately and consider professional digitization to avoid contaminating your equipment.
Common issues with aging tapes
Magnetic tape degradation happens naturally over time. The binder that holds magnetic particles to the tape substrate breaks down. This causes tape snapping, the tape literally tears or crumbles inside the cassette.
Tracking issues appear as fuzzy, distorted, or rolling video. This happens when the video head on your player doesn’t align perfectly with the tape. Professional equipment with time-base correction can often recover watchable video even from tapes with tracking problems.
Moisture damage causes the tape to stick to itself inside the cassette. If you try to force it to play, you’ll destroy the content. Heat and humidity are the culprits here.
Check your tapes now. The ones in worst condition should be digitized first.
VHS Tape Preservation Tips Before You Start
To digitize VHS tapes safely when you have a large collection, proper storage before the process begins protects your tapes and makes the job easier.
Cleaning and inspecting your collection
Before digitizing VHS tapes safely, clean the exterior of each cassette. Use a soft, dry cloth. Wipe away dust and debris.
Don’t use liquids or harsh cleaners. They can damage the plastic casing and seep inside.
For tapes with visible mold, isolate them. Place them in a separate container. If mold has penetrated deep into the cassette, professional equipment may be needed to prevent further damage.
Rewind each tape to the beginning. This removes slack and ensures even tension. A tape left in the middle or at the end may have uneven winding, which causes playback problems.
Check the cassette housing for cracks or loose parts.
Proper storage conditions
Store your tapes upright, like books on a shelf. Never stack them flat or lay them on their sides. This puts uneven pressure on the reels and can cause warping.
Keep tapes in a cool, dry place:
- Ideal temperature: 16-20°C
- Ideal humidity: 30-40%
- Avoid basements, attics, and garages where temperature and humidity fluctuate
Step-by-Step: How to Digitize Your VHS Tapes
The digitization process itself is straightforward. You’ll need a few pieces of equipment and some patience.
Step 1: Gather your equipment
You’ll need:
- A working VCR or VHS player
- Capture device (USB converter or video capture card)
- Computer with adequate storage
- Digitization software (many are free or inexpensive)
- RCA or composite video cables (if not included with your capture device)
Professional-grade equipment gives better results. Consumer USB converters work but often produce lower quality video. For tapes you want to preserve at the highest quality, professional digitization is worth considering.
Step 2: Connect your VCR or tape player
Connect the RCA cables from your VCR to your capture device. The yellow cable carries video. Red and white carry audio (right and left channels).
Step 3: Set up your capture software
Open your digitization software. Select the correct input source (your capture device). Adjust settings:
- Frame rate: 25 fps (PAL standard in Australia)
- Resolution: 720×576 or higher
- Bitrate: 4-6 Mbps for good quality without massive file sizes
- Deinterlacing: Enable this to convert interlaced video to progressive scan
Step 4: Start the digitization process
Insert your tape. Press play on the VCR. Press record in your software.
Step 5: Review and save your digital files
Once the capture finishes, review the file. Play it back in your media player. Check:
- Video plays smoothly without stuttering
- Audio is clear and in sync with video
- No major dropouts or distortion
Choosing the Best VHS to Digital Converter for Your Needs
Not all converters are equal. Your choice depends on your budget and quality expectations.
Professional-grade equipment versus consumer options
Consumer USB converters cost between $50-150 AUD. They work for casual digitization but produce lower quality. The video codec is often compressed heavily, and colour accuracy suffers.
Key features to look for
If you’re buying a converter, prioritise:
- Composite video input (RCA cables), older VCRs use this
- S-video input, better quality than composite
- USB 3.0, faster transfer speeds
- Software included, check that it works on your operating system
- Frame rate options, must support 25 fps for Australian PAL tapes
Avoid converters with unclear specifications or no customer reviews. A cheap converter that produces unwatchable video wastes your time.
Understanding the Cost of Professional VHS Conversion
Professional digitization varies in price. Several factors affect the cost.
DIY versus professional services
DIY costs are lower upfront. You buy a converter once and use it for your entire collection. But your time has value. Digitizing 50 tapes takes 50+ hours of setup, monitoring, and file management.
What affects pricing and turnaround
Tape quantity is the primary cost factor. Larger orders cost less per tape.
Digital File Formats and Quality Preservation
Once your tapes are digitized, file format matters. The right format preserves quality and ensures long-term accessibility.
Choosing the right format for your needs
MP4 is the most versatile. It plays on phones, tablets, computers, and smart TVs. File sizes are reasonable. Most people choose MP4.
Resolution and bitrate considerations
Resolution is the pixel dimensions of the video. Standard definition VHS is 720×576 pixels. Upscaling to 1080p doesn’t improve quality, it just makes the file larger. Save at native resolution.
- 4 Mbps: good quality, reasonable file size (standard choice)
- 6 Mbps: excellent quality, larger files
- 8+ Mbps: professional archival quality, very large files
Post-Digitization: Storage and Backup
Digitizing your tapes is only half the job. Storing those files safely is critical.
Hard drive and cloud backup strategies
Never keep digital files in only one place. A single hard drive failure means total loss.
Use the 3-2-1 backup rule:
- 3 copies of your files
- On 2 different types of media (hard drive + cloud, for example)
- 1 copy stored offsite
Organising your digital library
Name your files clearly. Use dates and descriptions: “1995-12-25_Christmas_Morning.mp4”
Organise files into folders by year or event. Create a spreadsheet listing what’s in each file. This saves time when you want to find a specific video.
Frequently Asked Questions
Can I digitize my VHS tapes myself, or do I need professional help?
You can digitize VHS tapes yourself if you have access to a working VCR, capture hardware, and digitisation software. However, DIY digitisation requires technical knowledge and carries risks of tape damage if you lack experience handling aging media. Professional services use time-base correctors, video signal stabilisation equipment, and trained technicians to handle tape warping, magnetic particle loss, and tracking issues. For irreplaceable family videos, professional digitisation reduces the risk of permanent data loss and typically delivers higher archival quality, though it costs more than DIY approaches.
How do I know if my old VHS tapes are too damaged to digitize safely?
Inspect your tapes for visible mould, tape warping, snapping, or severely faded labels. Play a short section to check for tracking issues, signal degradation, or audio dropout. Tapes stored in damp conditions or extreme temperatures are at higher risk of magnetic tape degradation. If a tape shows severe physical damage, professional technicians have specialised equipment to recover content from damaged media. Even tapes that won’t play on a standard VCR can sometimes be salvaged with professional-grade equipment and video restoration techniques.
What file format should I use when I digitize my VHS tapes?
Common formats for digitised VHS include MP4, AVI, and MOV. MP4 offers the best balance of quality and file size for most families. For archival purposes, consider lossless formats like AVI with high bitrate settings to preserve maximum resolution and video codec quality. Your chosen format should be compatible with modern devices and support long-term storage. Professional services typically offer multiple format options so you can choose based on your playback needs and storage capacity.
Is it legal to digitize VHS tapes for personal use in my situation?
Digitising VHS tapes you own for personal, non-commercial use is generally permitted under fair dealing provisions in copyright law. However, if the tapes contain commercially published content (films, television shows), copyright restrictions may apply. Family home movies and personal recordings are safe to digitise. If you’re uncertain about the copyright status of specific content, consult a professional digitisation service, as they understand the legal landscape and can advise on your particular collection.